- Running an application in a nested Wayland compositor
- Setting up
wlrobsto perform screen capture of the nested compositor - Setting up clipboard syncing so you can copy between compositors
#Nesting a Wayland Compositor
The first (and most crucial) step is to run your desired application in a nested compositor. This is similar to the solution of putting it on a dedicated virtual output, but it does not require you to perform any management of the virtual output. It will appear to you as a normal window, just with your application running inside. To do this, I use labwc to run the application. Unlike some compositors, labwc will not bail out if/run/user/1000/wayland-0.lock already exists, rather it will create a new lock file, such as /run/user/1000/wayland-1.lock. Super useful in our case, as we can run as many nested compositors as we want, minding the additional overhead when doing so.
In my specific case, I want to run the Zed IDE. To do this, I run the following command: labwc -s zed
This runs a new labwc instance with the -s flag ("run command on startup"). You can replace zed with the executable of the app you want to run. You may also want to try swapping -s for -S, as this will treat the application as a session and terminate labwc when the application exits. It does not work with every app, for example Visual Studio Code, so YMMV.
If the application has a built-in fullscreen option, I would suggest using that. Otherwise, labwc's server-side decorations provide an option upon right-click to fullscreen and hide the application window decorations, which may serve as a good fallback. With my proposed solution, you will be using server-side decorations of the window of the nested compositor (as opposed to the application) to resize the window of the compositor and the application as well. These decorations will not be visible during window sharing.
#wlrobs Setup
To capture this output, we will use wlrobs, an OBS Studio plugin that provides screen capture capabilities on wlroots-based compositors. This is different from the Screen Capture (Pipewire) source as wlrobs will use either wlr-export-dmabuf-unstable-v1 or wlr-screencopy-unstable-v1 depending on the source type you end up picking. I would recommend using wlr-export-dmabuf-unstable-v1, as it is more efficient by directly exporting the DMA buffer containing the screen contents, whereas screencopy copies the content into a buffer then provides that to the client. wlrobs is available in the AUR (Arch User Repository), GNU Guix, and Nixpkgs. If you are using a different distribution, you will need to build it from source. In my case, I use Fedora, so I had to installobs-studio-devel and wlroots-devel to build it. A compiler and meson were already installed on my system for development purposes, but you may need to install those as well if you haven't before. You'd probably know already if you did. The steps are pretty straightforward and well documented on the wlrobs repository, so I would suggest taking a look at that and making sure to copy the built plugin into your OBS Studio plugins directory after compiling.
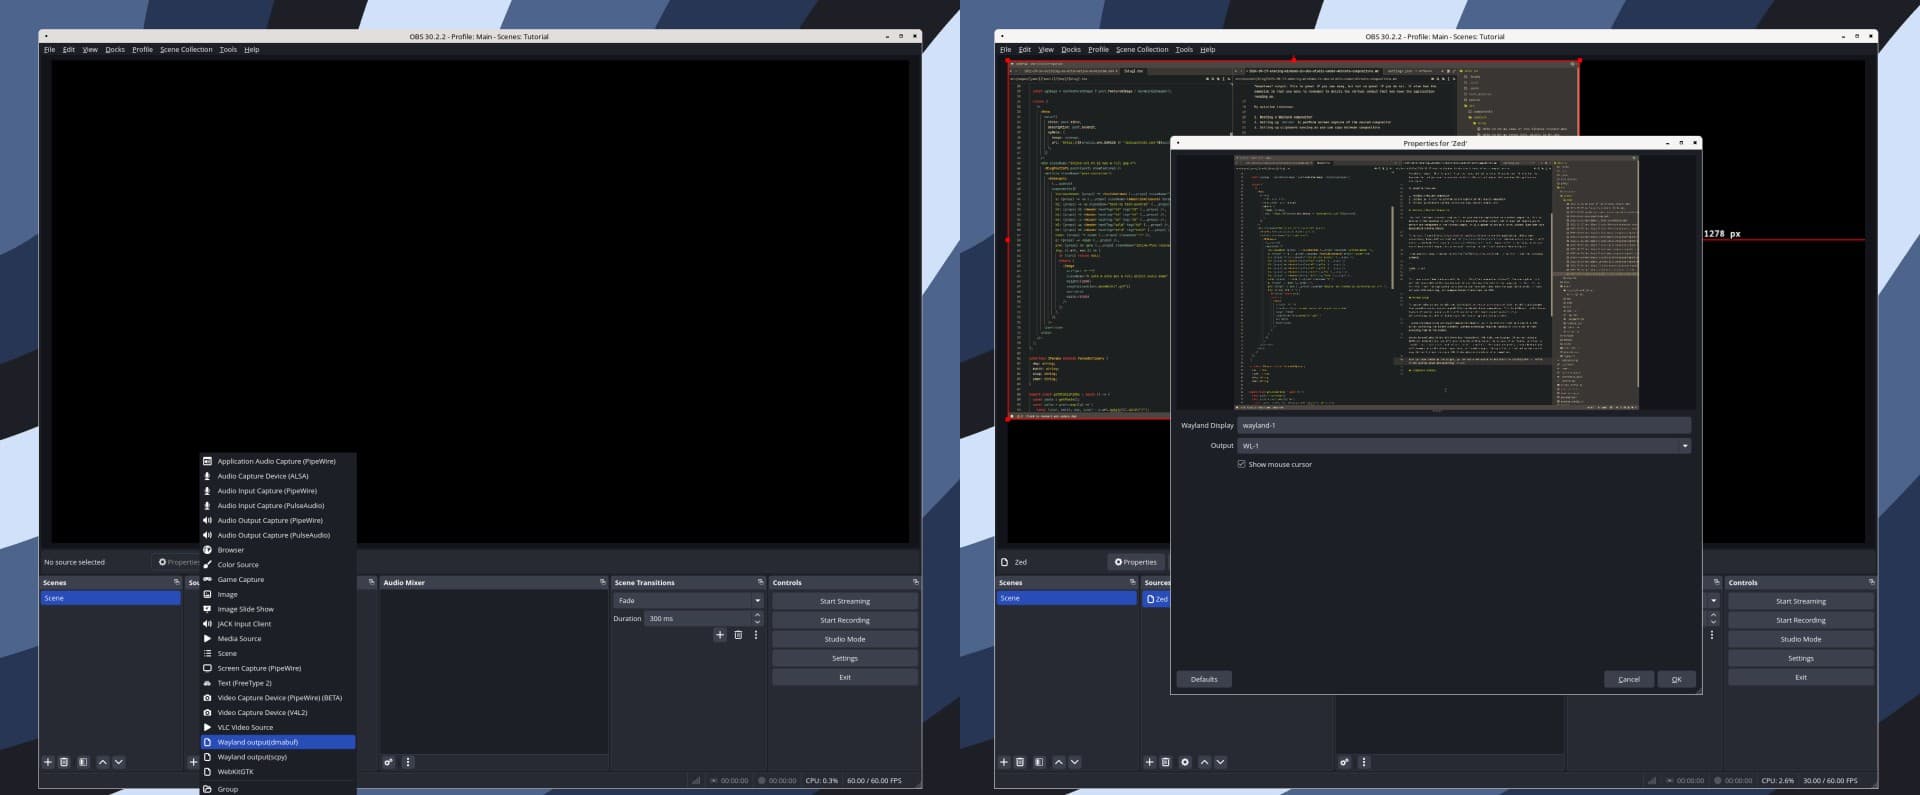
Once you have installed the plugin, you can add a new source in OBS Studio by clicking the + button in the Sources panel and selecting Wayland output(dmabuf). Type the name you want for the Source then you will be presented with three configuration options.

- First option is Wayland Display. This should map to the wayland socket that the nested compositor is running on. In my example, since my first nested compositor is running Zed, this will map to
wayland-1, so I put that. If you have multiple nested compositors running, you will need to increment the number for each one. - Second option is for the output on the compositor. For Output, this will likely be
WL-1and can be kept the same. - The third option is if you want to show the mouse cursor, so be sure to check that box if you do.
#Clipboard Syncing
Unfortunately clipboard syncing between Wayland compositors is where it falls apart a bit. To facilitate this, I am using clipboard-sync to sync the clipboard between the nested compositor and the host compositor, enabling copy / paste between the two. The tool is not perfect, for example sometimes I have to copy several times in order for it to work, or do a dance of trying to copy / paste between the two compositors to get it to work. But it is better than nothing, so for that I am grateful to the developer for putting the time into implementing this handy tool. That being said, I would suggest only running it when you plan on using nested compositors. The easiest way to install it is using cargo, the Rust package manager. There are a bunch of different ways to get this, but I would suggest using rustup. Once you have rustup installed, follow the instructions in the cargo section of clipboard-sync's README. If you want to always have clipboard-sync run at startup, you can enable the systemd user service by runningsystemctl --user enable --now clipboard-sync after running their command to download the service file. If you do not want it to always run on startup, I would still recommend starting and stopping it with systemctl, as it will restart clipboard-sync when it crashes. You can do this by running systemctl --user start/stop clipboard-sync (pick start or stop depending on desired action).
#That's it!
Hopefully this guide helps you get window sharing working or at least some pointers. If you are lucky, maybe by the time you read this my solution is not even needed. It is a bit of a hacky solution, but it works for me and I hope it works for you too! Best of luck with your streaming and recording! 🤘